Everyone knows I love vintage looking things. I think part of the reason is because I grew up surrounded by these types of things. My Mom had vintage things all over the house. Looking back, I wish she still had some of those things. I remember the old singer sewing machine, those awesome metal milk cans, washboards, milk bottles etc...
I thought I would share a couple of photos that I took of my kids (more as an art print for my walls than a photo) and give a few tips on how to achieve a look like this.
I love my bright coloured photos as of late, so I haven't done as many with the vintage processing but I am still in love and thought that I should share this simple process...
Here was my original photo:
I then used a vintage action (it's a free one, so for those of you with photoshop you can download it
here.
It's #8 called "Alys Vintage")
It has 7 actions in the set. The ones I use are, first the "Simply Vintage" action and then I run the "Old Canvas" action overtop of it. (this gives it some texture that I like)
Here is a screenshot I took to show you a couple of tips. You can click on it to see the image and instructions more clearly.
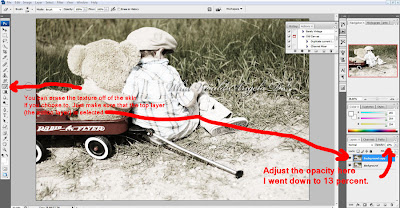
Actions add to the effect, but props and location are a really nice addition too.
Here are a few of my vintage samples. These 3, I have hanging on my wall.
This is one of my sons. I got him to sit down at the side of the country road where there was a bunch of tall grass. I got him to wear some khaki pants, a plaid shirt and a newsboy cap to achieve an older time period. Add a radio flyer wagon and a big classic looking teddy to pal around with, and you capture an emotion.
For this one I got my daughter to wear a classic longer pea style coat with a hat that had a brim all the way around. Add a suitcase and take her to an outdoor train museum, and you've taken this photo back in time.
For this one I happened to get the hat and jacket at a yard sale. I wanted an aviation style look for this one, so added the big glasses as well. Add the old fence in a field of long grass, my son chewing on a piece to add a "coolness" factor and voila. I'm thinking "Top Gun" may have been my subconcious inspiration for this one.
For those of you who do not know how to add an action to photoshop, it is pretty easy. For the Aly one, all you have to do is click on the action "Alys Vintage" then click on save. (Pay attention to where your file is going so you know where to retrieve it from) Mine go to a downloads folder. So I go to my downloads folder and double click on the zipped file. Then an ATN file will show up. Double click on that and it will open up your photoshop and go straight to your actions. You can also create your own actions, but I will cover that in another post sometime.


